Calendar: How to Use a Calendar with Your Website
Categories:
Why Add a Calendar to Your Website?
Adding a calendar to your website provides numerous benefits:
- Convenience: Visitors can quickly view events or schedule appointments.
- Automation: Sync schedules and reduce manual updates.
- Professionalism: Build credibility by showcasing a well-organized interface.
- Engagement: Encourage users to interact with your website.
Steps to Add a Calendar to Your Website
1. Choose the Right Calendar Tool
Decide on the type of calendar that best suits your needs:
- Static Calendars: Great for displaying fixed events.
- Interactive Calendars: Ideal for dynamic schedules, allowing users to interact (e.g., book appointments).
2. Embed a Calendar
Most calendar services offer an embed option, letting you add their calendar widget to your site or will provide the calendar on a website they provide which can be linked to. For example, Google Calendar provides HTML code that can be copied and pasted into your website:
- Go to Google Calendar.
- Click on the settings for the calendar you want to embed.
- Find the “Integrate calendar” section. See Integrating with a Service Provider section below
- Copy the embed code.
- Paste the code into your website’s HTML at the desired location.
If you don’t have access to your website’s HTML or prefer to consult an expert, consider reaching out to a developer.
Below, you can book an appointment with me through the integrated calendar or reach out via my contact page.
3. Customize the Design
Ensure the calendar matches your website’s design by customizing colors, fonts, and layout. Many calendar tools offer configuration options directly in their settings, or you can use CSS to modify the embedded calendar.
4. Make It Responsive
Optimize the calendar for all devices by using responsive design principles. Add CSS rules to ensure the calendar adjusts well to various screen sizes.
Integrating with a Service Provider
Why Use a Service Provider?
Services like Google Calendar or Google Appointments provide robust APIs, automatic syncing, and cross-platform accessibility. These integrations allow you to:
- Automatically update events on your website.
- Allow users to book appointments seamlessly.
- Sync events with other tools or devices.
Adding Google Appointments
Google Appointments streamlines booking by letting users select time slots directly from your website. Follow these steps:
- Set Up Appointment Schedules
- Log in to Google Calendar.
- Click on a date and select “Appointment Schedule.”
- Customize the available time slots and add details.
- Share Appointment Links
- Obtain a link to your appointment schedule.
- Embed the link or button on your website for easy access.
- Automate Confirmation Emails: Google automatically sends booking confirmations and reminders, saving you time.
See help guide.
Once you’ve followed the guide, you can share the link via email, text, or any preferred method. Use DNS forwarding to create short, user-friendly URLs—for example, appointment.mywebsite.com forwarding to your long Google Calendar link (your-super-long.google.com/calendarlink?aisfbalsibn23ihur23irbasfd).
For example, sending the URL book.snowdon.dev to https://calendar.app.google/ECgv242NeFTyfNYF7, much easier to remeber. Learn more about hyperlinks here.
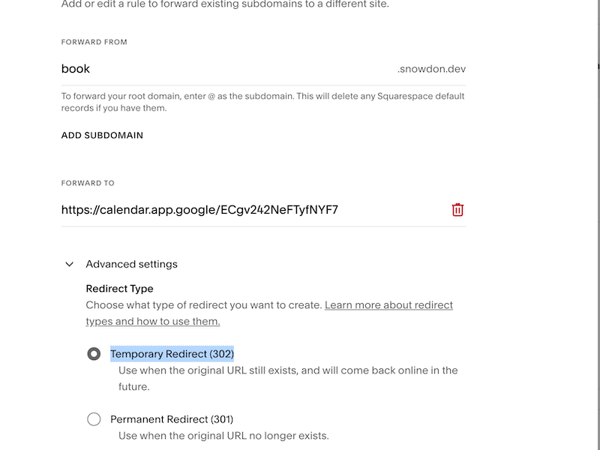
Using Squarespace to set up a DNS redirect that forwards your custom domain to a Google Appointment Booking screen.
The Google Appointment setup includes snippets of code that can be easily embedded into your website, like this:
<!-- Google Calendar Appointment Scheduling begin -->
<link href="https://calendar.google.com/calendar/scheduling-button-script.css" rel="stylesheet">
<script src="https://calendar.google.com/calendar/scheduling-button-script.js" async></script>
<script>
(function() {
  var target = document.currentScript;
  window.addEventListener('load', function() {
    calendar.schedulingButton.load({
      url: 'https://calendar.google.com/calendar/appointments/schedules/AcZssZ3CnePJHrc5V3FAUsRtwhf1VEmyHpA5LftczZeDidG8_3gQ_ZCVT_mpr7sCkvn--myoF6ih7P4T?gv=true',
      color: '#039BE5',
      label: 'Book an appointment',
      target,
    });
  });
})();
</script>
<!-- end Google Calendar Appointment Scheduling -->
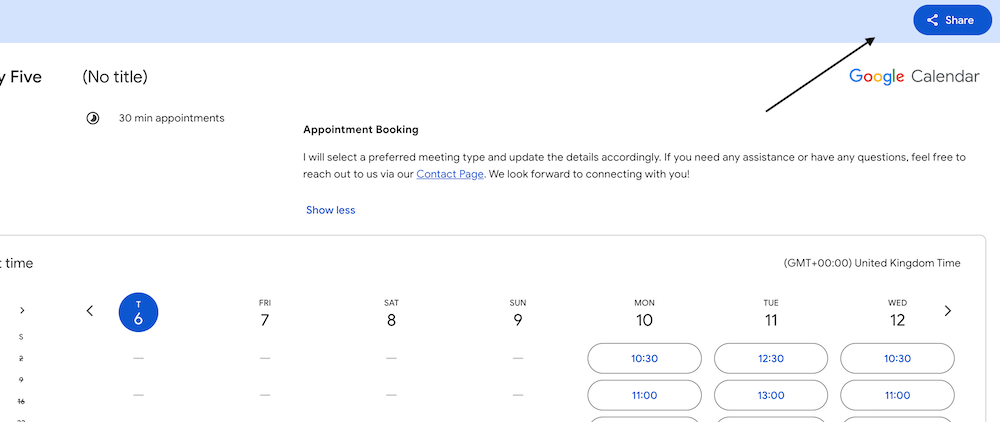
Once you’ve created your appointment schedule in Google Calendar or Google Appointment Scheduler, find the share link:
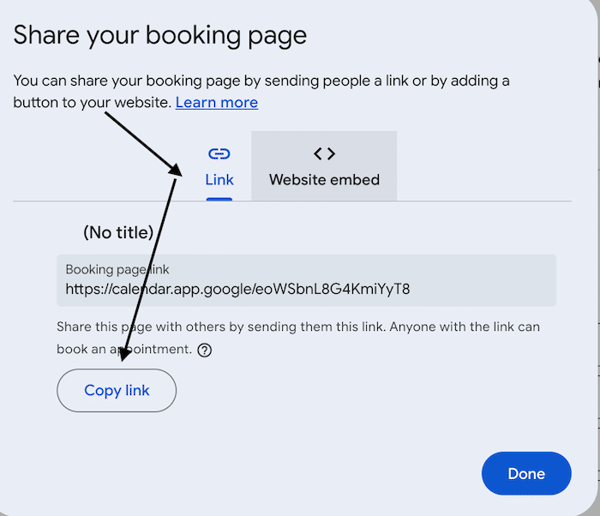
Then grab either the code snippet for adding to your website, or the URL for adding to the DNS forwarding.
Steps to Integrate with Google Calendar
This section details how to programmatically edit the calendar. This is necessary for creating automation changes that align with your business processes. For example, you can create a calendar for specific users when they sign up to your website (or pay a price) and populate it with events that handle business transactions, such as due dates or delivery times.
1. Obtain API Access
- Go to the Google Cloud Console.
- Create a new project and enable the Google Calendar API.
- Generate API credentials (OAuth 2.0 client ID or API key).
2. Install a Client Library: For websites using JavaScript
<script src="https://apis.google.com/js/api.js"></script>
3. Authenticate Users
Allow users to log in and connect their Google account to your website. Use Google’s OAuth flow for secure authentication.
4. Display Events on Your Website
Use the Google Calendar API to fetch and display events dynamically - for example on a admin page to create new events, the code may look like:
gapi.load('client', () => {
  gapi.client.init({
    apiKey: 'YOUR_API_KEY',
    discoveryDocs: ["https://www.googleapis.com/discovery/v1/apis/calendar/v3/rest"]
  }).then(() => {
    return gapi.client.calendar.events.list({
      calendarId: 'primary',
      timeMin: (new Date()).toISOString(),
      showDeleted: false,
      singleEvents: true,
      maxResults: 10,
      orderBy: 'startTime',
    });
  }).then(response => {
    const events = response.result.items;
    console.log(events);
    // Display events on the page
  });
});
5. Sync User Bookings
Allow users to create or edit events directly from your website:
gapi.client.calendar.events.insert({
  calendarId: 'primary',
  resource: {
    summary: 'New Appointment',
    start: { dateTime: '2024-12-31T10:00:00-07:00' },
    end: { dateTime: '2024-12-31T11:00:00-07:00' }
  }
}).then(response => {
  console.log('Event created:', response);
});
This approach can be extended to automate workflows such as creating personalized calendars for new users or setting up default events based on your business logic (for example when a user signs up they get their own calendar and events for deliveries or due dates).
How the browser handles creating events
Desktop versions of Chrome and Safari don’t have native functionality to directly create calendar events from a plain string of text. However, you can achieve this functionality through various approaches, depending on your needs.
1. Add an “Add to Calendar” Link
You can provide a link or button that uses calendar service APIs (e.g., Google Calendar, Outlook) to create an event from a string of text. This is straightforward and works in all modern browsers.
Example: Google Calendar
<a href="https://calendar.google.com/calendar/render?action=TEMPLATE&text=Event+Title&details=Description&location=Location&dates=20241231T235900Z/20250101T005900Z" target="_blank">
    Add to Google Calendar
</a>
- text: Event title.
- details: Event description.
- location: Event location.
- dates: Start and end time in ISO 8601 format (YYYYMMDDTHHmmssZ).
Example: iCal File Download (Works with Calendar Apps)
Create and link to an .ics file, which users can download and open in their default calendar app.
<a href="event.ics" download="event.ics">Add to Calendar</a>
Example .ics file content:
BEGIN:VCALENDAR
VERSION:2.0
PRODID:-//YourOrganization//NONSGML v1.0//EN
BEGIN:VEVENT
UID:12345@example.com
DTSTAMP:20241231T000000Z
DTSTART:20241231T235900Z
DTEND:20250101T005900Z
SUMMARY:Event Title
DESCRIPTION:Event Description
LOCATION:Event Location
END:VEVENT
END:VCALENDAR
2. Enable Interaction via JavaScript
If you want to allow users to select text and create an event programmatically, you can use JavaScript to parse the text and construct a calendar event.
Example: Google Calendar Integration
document.querySelector('#createEventButton').addEventListener('click', () => {
    const eventTitle = "Sample Event";
    const eventDetails = "This is an example event created from text.";
    const eventLocation = "New York, NY";
    const startDate = "20241231T235900Z"; // UTC format
    const endDate = "20250101T005900Z"; // UTC format

    const googleCalendarUrl = `https://calendar.google.com/calendar/render?action=TEMPLATE&text=${encodeURIComponent(eventTitle)}&dates=${startDate}/${endDate}&details=${encodeURIComponent(eventDetails)}&location=${encodeURIComponent(eventLocation)}`;

    window.open(googleCalendarUrl, '_blank');
});
Example: Dynamic Event Creation from Text Input
<input type="text" id="eventInput" placeholder="Enter event title">
<button id="createEvent">Create Event</button>

<script>
    document.querySelector('#createEvent').addEventListener('click', () => {
        const input = document.querySelector('#eventInput').value;
        const eventTitle = encodeURIComponent(input || 'New Event');
        const startDate = "20241231T235900Z"; // Default UTC start time
        const endDate = "20250101T005900Z"; // Default UTC end time

        const url = `https://calendar.google.com/calendar/render?action=TEMPLATE&text=${eventTitle}&dates=${startDate}/${endDate}`;
        window.open(url, '_blank');
    });
</script>
3. Leverage Browser Extensions
For users to create events from selected text, recommend using a browser extension or bookmarklet. Some popular options:
- Google Calendar Extension: Allows event creation from selected text directly in Chrome.
- Shortcut Bookmarklet: Write a JavaScript bookmarklet that parses the selected text and redirects to a calendar service.
Example Bookmarklet Code:
javascript: (function () {
    const text = window.getSelection().toString();
    const url = `https://calendar.google.com/calendar/render?action=TEMPLATE&text=${encodeURIComponent(text)}`;
    window.open(url, '_blank');
})();
4. Use Natural Language Parsing (Advanced)
Services like OpenAI API or Chrono.js can parse free-form text into structured data for event creation.
Example with Chrono.js
const text = "Meeting at 3 PM on December 31 in New York";
const parsed = chrono.parseDate(text);

if (parsed) {
    const startDate = new Date(parsed).toISOString().replace(/[-:]/g, '').split('.')[0] + 'Z';
    const googleCalendarUrl = `https://calendar.google.com/calendar/render?action=TEMPLATE&text=Parsed+Event&dates=${startDate}/${startDate}`;
    window.open(googleCalendarUrl, '_blank');
} else {
    alert("Could not parse date/time.");
}
5. Override the selection to provide menu option
document.addEventListener('selectionchange', function() {
  const selc = document.getSelection();
  const range = selc.getRangeAt(0)
  const container = range.startContainer;
  if (isNotSelectable(container)) {
    return
  }
  const text = window.getSelection().toString();
  const url = `https://calendar.google.com/calendar/render?action=TEMPLATE&text=${encodeURIComponent(text)}`;
  openMenu(url, "Google Calendar Event")
});
Summary
To enable event creation in Chrome or Safari:
- Add a link or button to services like Google Calendar or download an .ics file.
- Use JavaScript to dynamically construct URLs or handle user input.
- For advanced needs, parse natural language with libraries like Chrono.js.
Creating event on iPhone
To create text that an iPhone can recognize and use to create an event, you need to format the information in a way that iOS can detect as event data. This typically involves leveraging Data Detectors in iOS. These detectors recognize certain patterns, like dates, times, and event-related phrases, and provide users with options to interact with the content (e.g., creating calendar events).
Strategies for Event Creation on iPhone
1. Plain Text with Date and Time
iPhones can detect simple date and time mentions in plain text. When a user taps on such text, iOS prompts them to add the event to their calendar. Example:
Meeting with Sarah on December 31, 2024, at 2:00 PM.
To maximize detection:
- Use standard date and time formats (December 31, 2024, at 2:00 PM).
- Include specific event-related words like “meeting,” “appointment,” or “event.”
2. HTML
The
Example:
<p>Meeting with Sarah at <time datetime="2024-12-31T14:00:00+00:00">2:00 PM UTC</time>.</p>
When viewed on an iPhone, this can provide additional interactivity for calendar integration.
3. Calendar File (.ics)
You can provide a downloadable .ics file, which is the universal standard for calendar events. iPhones automatically open .ics files in the Calendar app, making it easy for users to add events.
Example .ics File:
BEGIN:VCALENDAR
VERSION:2.0
PRODID:-//YourOrganization//NONSGML v1.0//EN
BEGIN:VEVENT
UID:12345@example.com
DTSTAMP:20241231T000000Z
DTSTART:20241231T140000Z
DTEND:20241231T150000Z
SUMMARY:Meeting with Sarah
DESCRIPTION:Discuss the project details.
LOCATION:Office
END:VEVENT
END:VCALENDAR
Steps to Use:
- Save the content above to a file named event.ics.
- Provide a download link on your website or email:
<a href="event.ics" download="Meeting with Sarah.ics">Add to Calendar</a>
4. Event Link for Calendar Services
Direct links to calendar services like Google Calendar or Microsoft Outlook also work on iPhones and prompt users to add the event.
Example Google Calendar Link:
<a href="https://calendar.google.com/calendar/render?action=TEMPLATE&text=Meeting+with+Sarah&details=Discuss+the+project+details.&location=Office&dates=20241231T140000Z/20241231T150000Z">
    Add to Google Calendar
</a>
5. Siri and Shortcuts Integration
If you control the device or app, you can create integrations using Siri or the Shortcuts app:
- Provide a shortcut that parses natural language or .ics data and adds it directly to the Calendar app.
Tips for Compatibility
- Use Natural Language: Write dates and times explicitly in a natural, unambiguous way. Good: “Meeting on December 31, 2024, at 2:00 PM.” Avoid: “Meeting next Tuesday at 14:00.”
- Include Time Zones: Always specify the time zone if the event involves users in multiple regions.
- Test on Devices: Ensure the text or file is properly recognized by trying it on an actual iPhone.
Conclusion
Integrating a calendar with your website enhances usability, simplifies scheduling, and keeps users engaged. By embedding a calendar or leveraging services like Google Calendar and Google Appointments, you can create a seamless experience for your visitors. Take the time to customize and optimize your calendar for maximum impact!
Feedback
Was this page helpful?
Glad to hear it! Please tell us how we can improve.
Sorry to hear that. Please tell us how we can improve.